Technical information about the photosensitive exposure process
StencilPro™ is a photosensitive film that is exposed using Ultra-Violet light (UV), hardening the emulsion coated to the film. When the film is developed by placing into water, the unexposed emulsion is softened and washed out, leaving the deign in the screen. Further exposure back to UV then hardens and cures the remaining emulsion making it permanent, waterproof and ready for use.
There are 3 factors that affect the exposure setting for StencilPro™ film, with each have a wide range of variables that will effect how long your exposure time will be:
What UV light you use - sunlight or 2000K/ 4000K/ 5000K fluros?
How far the light source is from your StencilPro™
The length of time you allow the UV to expose the StencilPro™ film
1. Intensity of UV light source
The power and frequency of the UV light source with which StencilPro™ is exposed.
Energy saving light globe and compact fluro globe light-source technologies or longer fluorescent-tube arrays for screen exposure - which is best?
The lamp types are different with each lamp type offering a different output frequency and power. These two factors combine to determine light intensity, and have a lot to do with how efficiently StencilPro™ film can be exposed. Each has its effect in the following ways:
Output power. When lamps of the same type are compared, the higher-wattage lamp will expose StencilPro™ in a shorter length of time than the one of lower wattage. For example, a 4000-watt lamp provides twice the output power of a 2000-watt lamp. Exposure time, then, with 4000-watt (all other variables being equal) be half that of the 2000-watt.
Output frequency. This factor has a direct affect on how operates as many globs lamps fall short in this area, hence why they are not recommended for StencilPro™ exposure. Ideally, the greatest lamp output should be in the UV frequency range to which the StencilPro™ film is most sensitive - this being blue light at the end of the UV spectrum.
However, all lamps output in not only the UV range which is used for exposing StencilPro™, but also in the infrared (heat-producing) range and, of course, the visible light spectrum.
So some of each lamp's output wattage is spent producing essentially useless (for exposure purposes) light and heat. But how much? That's the real issue. Two different lamps can be rated comparably in power (each is, say, 2,000 watts) yet, if most of one bulb's wattage goes toward output in the UV-light range, while the other bulb's wattage is heavily spent on output in the visible light range, they will be different in exposing StencilPro™.
Wattage alone, therefore, is an unreliable indicator of a lamp's true efficiency. To achieve the highest UV intensity, an exposure lamp must have not only high output power, but must also devote as much of its wattage as possible to producing UV-light. Generally, the more efficient lamps are more expensive, both in cost and power consumption.
It's important to note that none of the above lamp types (no matter what wattage or UV output each generates) will fail to fully harden or expose StencilPro™ however these factors can, and do, have a direct and significant effect on the minimum length of time required to produce optimum exposure.
Added to this you need to remember lamp output will also decline with use, no matter what lamp you choose. In other words, lamps gradually age, and this makes control of the intensity variable difficult without regular testing and/or additional equipment.
Temperature/ Light Spectrum (Blue is better) |
|
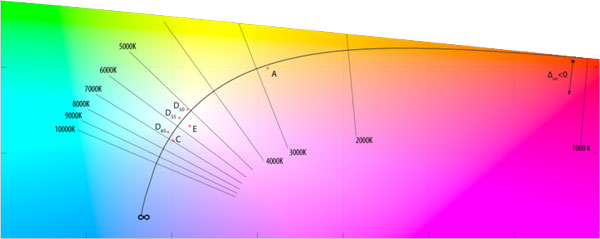 |
Here's a graph showing Mired levels in light. |
What is recommended for StencilPro™?
The manufacturers recommended light type is direct sunlight exposure. Below is a guide to sunlight levels
| Temperature | Source |
|---|---|
| 1,850 K | Sunset/sunrise |
| 5,000 K | Horizon daylight |
| 5,500–6,000 K | Vertical daylight |
| Note: These temperatures are merely characteristic;considerable variation may be present. Source | |
For indoor exposures use fluroescent tube with high UV output (remember actual 'light' is not important), with a lower Mired number as this is higher towards the blue spectrum.
| Fluro Tube 'Type' | Colour temperature | |
|---|---|---|
| (K) | (Mired) | |
| Warm/soft white | < 3,000 | > 333 |
| (Bright) white | 3,500 | 286 |
| Cool white | 4,000 | 250 |
| Daylight | > 5,000 | < 200 |
2. Exposure distance
The importance of calculating the distance between your exposure source and your StencilPro™ film.
Although the previous variable (light source) suggests considerable diversity, distance provides still more choices because lamp intensity also tends to fall off as the distance from the lamp increases.
Naturally, the intensity measurable at the surface of exposure is never as high as it is at the lamp surface. Worse yet, with globe type lights, the distance between lamp and stencil increases as you move outward from the center of the stencil (the closest point) to any edge.
Using globe lamps provides a unique problem, the need for intensity vs the need for uniformity or consistency of exposure over the entire stencil surface.
Too close |
|
 |
When the light source is too close a 'hot spot' is created in the center with heavy drop off toward the edges. The result is a inconsistency in the amount of UV exposure from center to edge. Screens will be over imaged in the centre and under exposed on the edges. |
Right Distance |
|
 |
Increasing the distance will improve the consistency (though it won't ever make it uniform), but it greatly reduces UV intensity and a 'hot spot' occurring. Exposure distance should equal to the screen's corner-to-corner measurement providing good results. When using a globe, though it doesn't optimize either intensity or consistency, it's generally considered to be the optimum balance between them. |
The above, however, applies only to globe light sources, and here is where the globe vs fluorescent-tube battle heats up. Manufacturers of fluorescent units argue that their multi-lamp arrays, placed close to the surface, provide a more consistent exposure, by design, than can be had from any globe light source. Globe users can people reply that, although this may be true, multi-lamp arrays tend to multiply the incidence of image undercutting (light is directed out in all directions and bounces/ reflects off surfaces and light enters the film under the artwork).
What is recommended for StencilPro™?
The manufacturer recommends height for fluroescent tube 40cm above the exposure.
3. Length/ time of exposure
The length of exposure required, balanced against the exposure distance and intensity.
The time an exposure takes increases exponentially as lamp-to-stencil distance increases. For instance, if the distance doubles, the exposure must be 22, or four times as long.
Distance and time become another pair of competitors in the durability vs image- quality game: The longer StencilPro™ is exposed to UV light, the harder it becomes. This is the key to film durability, however the longer the stencil is exposed, the greater is the loss of image resolution due undercutting.
Undercutting occurs as light passing through the film tends to refract slightly-that is, it bends or scatters-around the edge of the stencil outline. Though light scatter is normally very small (assuming the image in the film emulsion is in direct contact with the stencil surface), its affect builds with time. Scattered light can harden stencil material inside the image outline, causing poor edge definition and even complete loss of fine details.
The shorter the exposure, of course, the less undercutting can occur. However, if the exposure is too short, StencilPro™ won't fully harden even where it's supposed to. The result is worse: premature stencil breakdown and low run durability. Therefore, the optimum exposure duration must strike an acceptable balance between the competing needs for durability and good image resolution.
What is recommended for StencilPro™?
Well if you read all the above you have probably already have in mind what light source you are going to use (so you'll know your distance) and now need to know how long for?
Test a sample. Yes not the answer you were after, but you will also know by reading the above that we can give you a guide only, as your sunlight time will vary on the time of day, or the brightness of your fluro.
Below is the manufacturers guide to get you started. To see our real life tests results (pic's where available) click here . .
| Sunlight | Full Spectrum Fluroescent Tubes | Daylight Fluroescent Tubes |
Cool White Fluroescent Tubes |
||||||
| Standard | HiRes | Standard | HiRes | Standard | HiRes | Standard | HiRes | ||
| StencilPro™ | 25 sec. | 16 sec. | 3 min. | 2 min. | 5 min. | 3 min 10sec | 11 min. | 8 min. | |
4. Soaking and Developing
Washing out and developing the exposed StencilPro™ film.
Once the stencil is exposed, it is developed (or processed), simply by washing out the unexposed portions with water. And even here, balance must be the goal.
StencilPro™ must be left in water to develope for a minimum of 10 minutes before attempting to remove the emulsion. This process is called soaking. It's important to remember not to expose the design to any further UV as it's not set at this point, so soaking inside the Opaque Storage Container with the lid on top is recommended.
After 10 minutes the emulsion can be brushed our of the film. Excessive water pressure and/or temperature will degrade stencil quality and durability as you are forcing off the good part of the film - use running tap water only or still water inside the Opaque Storage Container.
Higher water pressure or temperature does not equal faster wash out.
Wash-out works best between room and body temperature 20°C to 37°C (70°F to 98°F).
It's tempting to use water force to speed up wash out. Though resistant to water, the exposed film is still somewhat soft. Image edges can be damaged with high wash-out pressure, especially if the hose nozzle is held too close to the film surface. A directional-type nozzle that can concentrate water into a thin stream may make that temptation irresistible, so remove the temptation by installing a water-hose nozzle with a fine, widely diffused spray pattern.
Wash-out time is also a factor.
Wash-out should continue until image areas are cleared of emulsion and the dissolved emulsion has been rinsed away from both sides of the screen to prevent scumming. Scumming occurs on poorly rinsed screens, when un-rinsed emulsion flows back into image areas, especially of fine details, and dries.
It forms a thin, transparent film that can bridge mesh openings and block ink passages, but may appear open upon casual inspection.
Therefore, screens should be checked during the rinse (remaining emulsion will make the surface feel slimy) and visually inspected with care when dry.
4. Re-expose and Dry
Harden the StencilPro™ film ready for use.
After soaking and removing the emulsion during wash-out, your StencilPro™ film must be dried and re-exposed to set the remaining emulsion.
This process is critical as it will ensure screens are no longer reactive to any further UV exposure, are water resistant and may be used/ printed.
Reference: Wikipedia, Printers GuideBook (Part IV) Richard Greaves.com